
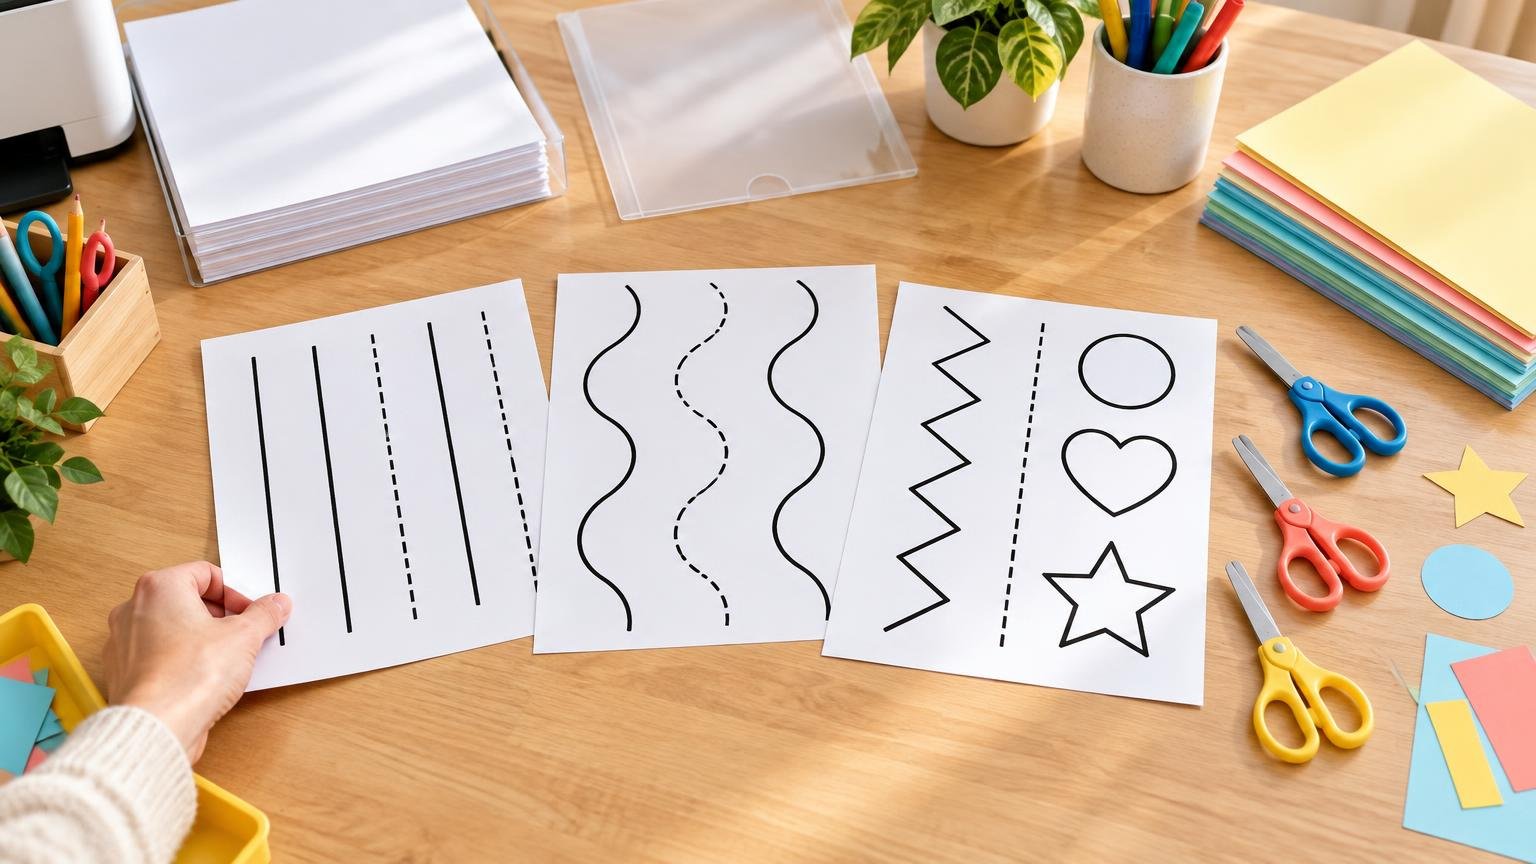
TLDR: Start scissor practice with ordinary printer paper, a bold high-contrast cutting path, generous open space, and one cutting challenge per page. Move flexibly from snipping and short straight routes toward longer lines, curves, corners, and simple shapes. Use heavier paper only when its extra stability helps more than its cutting resistance, and confirm that the printer supports it. Keep sheets disposable for actual cutting; reserve lamination or sleeves for tracing, demonstrations, visual directions, and activities using pieces that an adult has already cut.
Good scissor skills printable paper should fit the child’s current cutting control, the available scissors, and the printer—not an arbitrary age or worksheet level. Before printing, decide whether the immediate task is making single snips, following a straight route, changing direction, rounding a curve, or cutting out a shape. That choice should determine the path design and paper, rather than selecting cardstock simply because it appears more durable.
Scissor use develops from basic handling toward more controlled cutting along lines and around shapes, but published developmental descriptions are broad patterns rather than deadlines for individual children. Head Start includes basic scissor use within preschool fine-motor development, while MedlinePlus describes supervised use of blunt-tip scissors and later straight-line cutting as general developmental information. The practical goal is to offer a manageable next step, not to use a printable as a readiness test.
Choose the cutting path before choosing the paper
A cutting sheet works best when it isolates one main demand. A child who is learning to open and close scissors does not also need a narrow spiral, several sharp corners, and distracting pictures. Start with a route the child can identify immediately, then make one element more demanding on the next page.
New York City Public Schools occupational-therapy guidance recommends beginning with straight lines, progressing to basic shapes and then to more complex shapes. It also suggests making outlines bolder and providing hand-over-hand assistance when needed. The occupational-therapy guidance from New York City Public Schools offers this as practical support rather than a rigid curriculum.
A flexible production sequence is:
- Free snips along the edge of a broad strip, with no requirement to reach a target.
- Short straight routes with obvious start and stop points.
- Longer straight routes that require the helping hand to reposition the paper.
- Gentle curves with plenty of blank space on both sides.
- Simple direction changes, such as one broad corner or a wide zigzag.
- Large basic shapes with uncomplicated outlines.
- Smaller shapes or routes combining curves and corners, introduced only when the earlier format is manageable.
These are design stages, not age bands. A child may handle curves more comfortably than corners, or may need to return to short lines when using unfamiliar scissors or different paper. If a page causes repeated tearing, frustration, or unsafe positioning, simplify the path, shorten the route, or change the material.
Design scissor skills printable paper for visual clarity
The cutting path should be the most visually prominent element on the sheet. Use a dark line on a light background, or another combination with strong contrast. Make the route visibly heavier than decorative outlines, but test it on the actual printer instead of relying on a universal line-weight specification. Drafting software, printer resolution, scaling, and ink settings can all change how a line appears on paper.
For beginner sheets, leave generous blank space around the route. Crowded clip art, patterned backgrounds, dotted borders, and nearby text can compete with the line the child is meant to follow. If the illustration is part of the reward, place it beyond the stopping point or in a separate area rather than wrapping details around the cutting path.
Helpful page-design features include:
- A visible starting cue near the paper edge, so the child does not have to cut through a large blank area first.
- A distinct stopping cue that is different from the cutting line.
- Wide spacing between routes so one cut does not accidentally remove the next activity.
- A single primary skill on each page, especially for initial practice.
- Short adult directions placed away from the cutting area.
- Adequate interior margins so no important path is clipped during printing.
- A sample strip at the edge of a class master for checking contrast, scale, and paper behavior before producing the full set.
Printer scaling deserves attention. Options such as “fit to page” can shrink a route, narrow the surrounding space, or alter the intended relationship between a starting cue and the page edge. Print one copy, measure or visually inspect it, and then use the same settings for the remaining set.
Ordinary printer paper is the practical starting point
Plain paper is affordable, easy to replace, and compatible with many routine cut-and-glue activities. It also keeps the activity disposable: the child can make several attempts without an adult feeling that a costly sheet has been wasted. For most basic practice pages, start with the plain paper already approved for the printer.
Regular paper can fold or buckle in the helping hand, but that is not automatically a reason to switch to cardstock. Try reducing the sheet first. An adult can cut a full page into broad strips or separate individual routes before the activity begins. A smaller piece is often easier to rotate and does not leave as much excess paper hanging from the child’s hand.
The site’s cutting practice printables can be used as examples to inspect before printing: look at the route length, visual contrast, surrounding space, and amount of paper a child will need to manage.
When heavier paper helps—and when it makes cutting harder
Construction paper or light cardstock can feel more stable than thin paper, which may help when a sheet keeps folding or sliding. Heavier material can also make pre-cut cards and sorting pieces easier to handle. The tradeoff is resistance: a thicker or denser sheet may require more hand effort and may be harder to turn around a curve.
Do not assume that more stiffness creates an easier beginner task. Test one short straight route with the actual child scissors and paper. Check whether the blades close smoothly, whether the paper tears instead of cutting, and whether the child can reposition the sheet without twisting the cutting hand. If resistance becomes the main challenge, return to lighter paper.
| Material choice | Useful starting situation | Main tradeoff |
|---|---|---|
| Plain printer paper | Routine snipping, lines, cut-and-glue pages, and multiple attempts | Can bend or tear, especially when a full sheet is difficult to manage |
| Construction paper | High-contrast routes or a moderately more stable hand-held piece | Texture and thickness vary; some sheets resist scissors or do not feed cleanly |
| Light cardstock supported by the printer | Stable pre-cut strips, cards, or pieces intended for handling after cutting | Adds cutting resistance and may require a special tray or media setting |
| Laminated sheet or reusable sleeve | Tracing routes, demonstrating direction, or using adult-pre-cut matching pieces | Not suitable as the default material for repeated child cutting |
Check the printer before loading cardstock
Printer media limits are model-specific. For example, Epson lists a 60–90 gsm ordinary-paper range for one model and treats heavier cardstock as a distinct media category, while Canon lists a 64–105 gsm plain-paper range for one PIXMA model. These examples show why there is no single paper-weight rule for every home or school printer.
Before buying heavier stock or printing a class set, check the printer manual or official support page for accepted media types, weight or thickness limits, tray instructions, and the correct media setting. Use a rear or manual feed only if the manufacturer directs it. Keep important paths away from page edges because printable areas and nonprintable margins also vary by model.
For larger quantities, full-bleed color, precision cutting, or materials a home printer cannot feed reliably, professional printing options may be worth comparing with the time and supplies required at home. Basic black-line practice sheets, however, are usually most economical when printed as needed.
Keep cutting sheets disposable and support materials reusable
Laminating a worksheet protects it, but it conflicts with the main purpose of a sheet meant to be cut apart. Laminated material is stiffer, can create sharp cut corners, and still becomes permanently altered when cut. A reusable format is more useful for activities that prepare for or accompany cutting rather than replace it.
Use a dry-erase sleeve or laminated master for tracing a route with a finger or marker, following arrows, reviewing scissor-safety pictures, sequencing steps, or matching pieces that an adult has already cut. Then provide an unlaminated paper copy for the actual cutting. If storage is important, keep the reusable direction card in a labeled envelope and replenish the disposable cutting strips as needed.
Build supervision and safe handling into the printable
Scissor pages should include a brief adult-facing note rather than placing the entire safety responsibility on the child. Use appropriate child scissors, remain close enough to intervene, and adapt the setup to the child and setting. Head Start advises passing scissors closed with the loops facing outward, and CDC guidance identifies active supervision as a safety responsibility in early-care environments.
A concise note can say: “Adult supervision required. Use appropriate child scissors. Cut while seated, keep scissors pointed away from the body, and pass scissors closed, handle first.” Adults should demonstrate the rules before distributing supplies. If a child needs adapted scissors, positioning support, or individualized help, seek guidance appropriate to that child rather than treating difficulty as noncompliance.
Troubleshoot the page before increasing difficulty
| Problem | Likely production issue | Practical adjustment |
|---|---|---|
| Paper tears repeatedly | Paper is being pulled, the route is too long, or the scissors and material are a poor match | Try a shorter strip, lighter paper, or different appropriate scissors |
| Cuts drift away from the line | The path is faint, narrow, crowded, or beyond the current level of control | Darken and simplify the route; add blank space and shorten it |
| The child cannot turn a corner | Too much excess paper or a direction change that is too abrupt | Pre-cut a manageable section and use one broad corner |
| Cardstock will not feed | The media is unsupported, incorrectly loaded, or using the wrong setting | Stop printing and check the printer’s official media and tray instructions |
| Part of the route is missing | The design extends into the nonprintable margin or scaling changed | Move the path inward and print a test copy at the intended scale |
| The activity feels too busy | Pictures and multiple routes compete for attention | Use one path, one start cue, one stop cue, and minimal decoration |
Common questions about cutting-practice sheets
What paper works best for printable scissor practice?
Begin with plain paper approved for the printer. It is inexpensive and easy to replace. Change to construction paper or supported light cardstock only when added stability serves a clear purpose and the child can cut it comfortably.
Can cardstock be too difficult?
Yes. Greater stiffness can reduce folding, but it can also increase resistance and make curves or corners harder. Test one small piece with the actual scissors before producing multiple copies.
Should cutting pages be laminated?
Not for routine cutting. Laminate visual directions, tracing routes, or companion activities instead. Print the sheet that will be cut on disposable paper.
Which cutting paths should come first?
Use the simplest path that creates a manageable next step. Snips and short straight routes commonly come before longer lines, curves, corners, and shapes, but progression should respond to the child rather than a fixed age schedule.
Print one test sheet before making the set
The most useful scissor-practice page is not necessarily the thickest or most decorative. Choose one clear cutting goal, print a bold route on an affordable supported paper, and test the sheet with the intended printer and scissors. Check the margins, scale, contrast, resistance, and amount of loose paper the child must manage. Once that single copy works, reproduce the set and keep the next stage only slightly more demanding.
References
- Perceptual Preschool | HeadStart.gov
- Preschooler development: MedlinePlus Medical Encyclopedia
- Occupational Therapy Supports
- faq-00007ff-amc4000_6000 | SPT_C11CJ43201 | Epson WorkForce Enterprise AM-C4000 | WorkForce Series | All-In-Ones | Printers | Support | Epson US
- Shop Canon PIXMA TS7722 Wireless Home All-in-One Printer | Canon U.S.A
- Tips for Keeping Children Safe: A Developmental Guide – Preschoolers | HeadStart.gov
- Safety, Health, and Injury Prevention Recommendations | Early Care and Education Portal | CDC